In 2011, Transferwise was started by Skype’s first employee, Taavet Hirinkus. The transfer has now become a worldwide multi-currency service to transfer and manage assets.
How to Receive Payments Through TransferWise in Pakistan?

During the birth year of the company, it amounted to 10 million euros. As compared to a competitor site, Monito, it was discovered that Transferwise had an 83% cheaper exchange rate than several significant banks in Europe, however in some cases, that number would drop to 80%.
Global Achievements by TransferWise
Some of the achievements since the company has begun are listed below
- “East London’s 20 hottest startups”, The guardian
- Startup of the week, Wired UK
- “Startups to watch”, Seedcamp 2021 US demo day
- “Top 100 UK Startups”, Startups.co.uk
- Ranked eighth on CNBC Disruptor 50 list
- Named World Economic Forum Tech Pioneer in 2015
They announced their first Asia Pacific service center in April 2017. The office was located in Singapore. During the same year, they announced their service was being used so often that their system recorded the users were sending over 1 Billion euros monthly (via Transferwise).
The achievement led the brand to profit significantly just after six years of commencement. Later, in 2019, Transferwise grew to Brussels as well.
The company got rebranded to Wise on February 22, 2021.
Why Use TransferWise to Receive Money From Around the World?
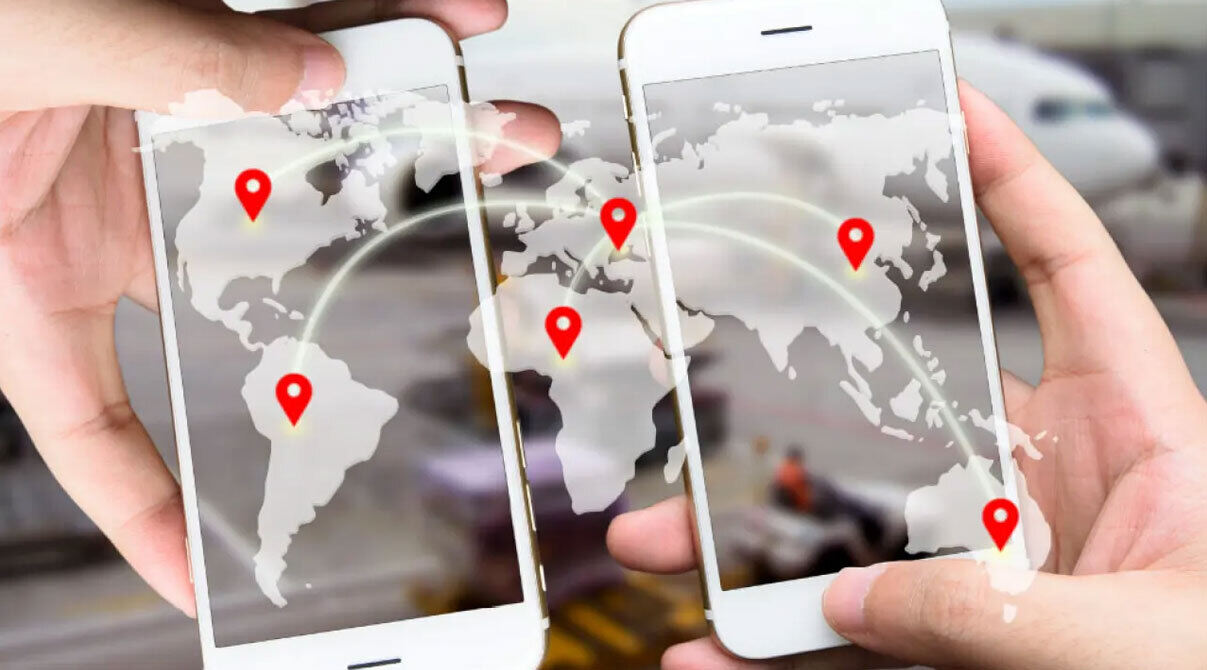
Transferwise covers over a thousand routes and enables 71 countries to send money and 43 countries to receive it in 49 currencies!
Transferwise understands that sending money abroad can be expensive. This is why their swift and smooth money transfer is eight times cheaper than banks.
It is the top choice for leading companies. Since covid a majority of people have started working from home, this entails their jobs might not be in the same area, city, country, and even continent.
Related: Ignite and JS Bank Collaborate to Support Young Entrepreneurs of Pakistan
Guide to PKR Transfers Using TransferWise
Times like those are when services from TransferWise benefit you. Receive a salary in your currency with TransferWise.
1. Open Website

The first step is to open your browser and surf to https://wise.com/. You will gain access to the main web page of Wise’s website.
Click on ‘Get an account in minutes’; shown with a green background.
2. Enter your email
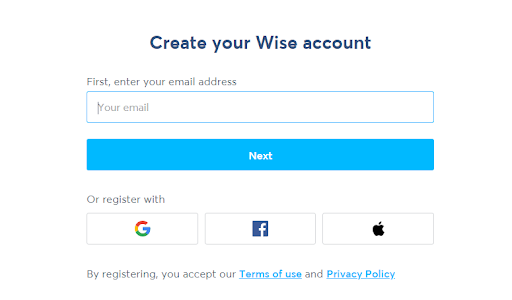
This will lead you to another page asking for your email. Here you are required to enter the email to which you have access, all your transaction reports will be sent to this email. News about updates and general news regarding the application will also be sent to you.
3. Personal or Business?
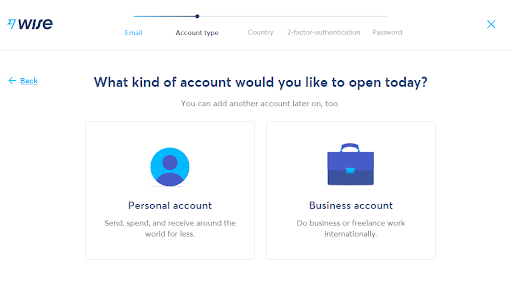
Next, you will have to select whether you need an account for personal use or business use.
A personal account allows you to spend, spend, and receive payments from all over the world.
A business account does the same but gives you access to transfer larger funds and; You can use it as a bank account; it will create the backing of your customer and company relations.
You can sync all the payment systems and save time on accounting. Your funds will be tracked in real-time.
Pay multiple employees, vendors, and more together with batch payment.
You can add users to your account like employees so you need not add their information every time a transaction occurs.
From this step onwards a blue line will appear on top which will track your progress.
Related: Tania Airdus Kickstarts D-Bank – A Pakistani Digital Bank
4. Choose Your Country

This will give your account an idea of where the company is coming from or where it is going. This will also inform you of any hindrance while using wise in your region. If you are making an account for someone else; you can always change the location and the currency you’re using.
5. 2-factor Verification

This step will require you to add your phone number for your own safety. Every website that deals with asset exchange via the internet require this method. Every time someone tries to break into your account, they won’t have just the password to deal with, they will require your mobile access as well.
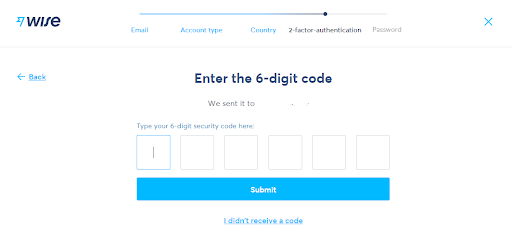
After entering your phone number, you will receive a 6-digit numerical code for verification that the number you entered belongs to you. If you did not receive the code, it will be sent again or you can go back and validate the phone number.
6. Create Your TransferWise Password
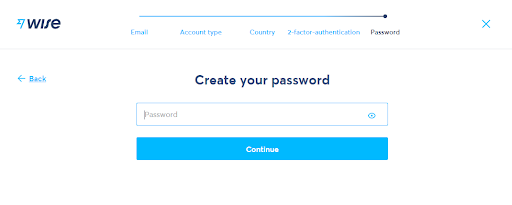
After confirming it is your number, the next step is the password. There are guidelines to follow while deciding on a password;
- It has to be longer than eight characters
- Should contain one upper case alphabet
- Must contain a number
- Should have a special character
Following these guidelines will make your password unique and more difficult for other to remember, let alone unearth.
Read more: HBL Launches WhatsApp Banking Service
7. Receive Payments From Abroad
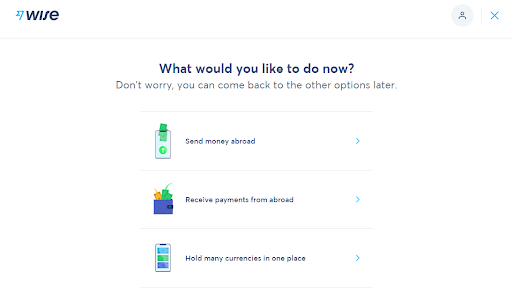
On this page the website gives you three options; send money abroad, receive payments from abroad or hold your currencies in one place. You can always come back to this page or change it from within your account.
Select receive payments from abroad to enable your account for the UK to Pakistan transactions.
8. Enter Personal Information on TransferWise Account
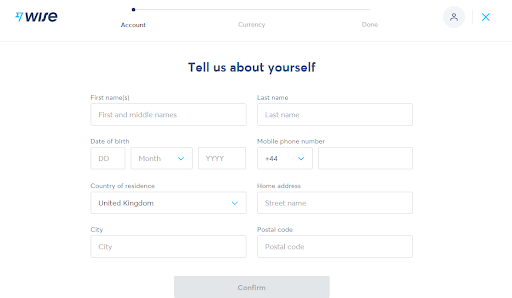
The next step requires you to add your personal information, which includes; your name, date of birth, mobile phone, country, address, city, and postal code.
All this information is required to make your Wise account and commence the international transactions.
The progress line at the beginning shows that you’re on the last three steps of getting your account ready for use.
9. Choose a Currency
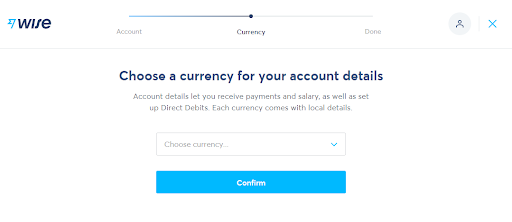
The second last step asks for your account currency. This is the currency in which all your assets will be displayed to you in case of a personal account and to your employers in case of a business account. If you are located in Pakistan, the currency you deal in is the Pakistani Rupee (PKR). You will select PKR so all your assets are displayed in rupees.
10. Confirm Deposit
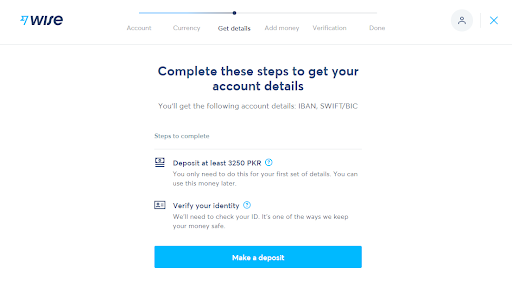
At this step, you will observe three additional steps appearing in the progress bar. They include information that cannot be decided without your preferred currency. For Example, if 3250 PKR is the minimum deposit you can make, it might be different for another currency.
This page also notifies you of the information you will receive after making the account.
11. Add money
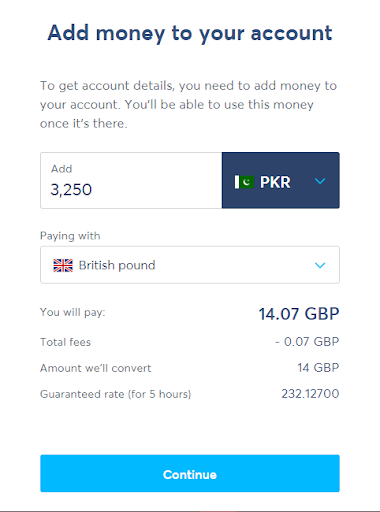
In order to create a gateway that allows you to receive money from the UK to Pakistan. You will need to acquire your account details. Basically, you’re paying yourself. You’ll have to add a specific amount of money to your account to receive information about your account.
Since we are creating a gateway between the UK and Pakistan, select ‘Pounds Sterling’ from the ‘Paying with’ option list.
12. Payment Method
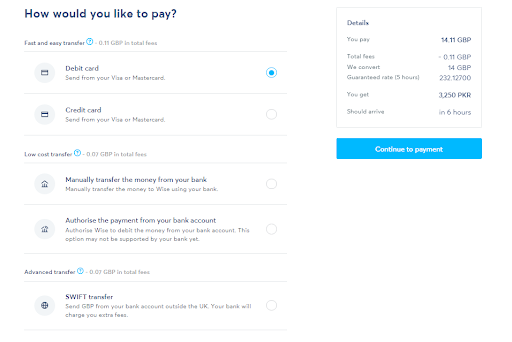
We know that we have to put some money in our bank account (pay ourselves) in order to initiate the account. So in this step, you get three options that you can transfer the cash by. You can use a Debit or credit card, with a GBP deduction of 0.11, a low-cost transfer (authorized from a bank or transfer manually) that costs 0.07 GBP, or an advanced SWIFT transfer that has the same asset reduction as a low-cost transfer.
You are informed that your payment will arrive back to you within 6 hours.
13. Add Your Card Information

This step requires your card information if you selected a card payment option. In the case of the other two options, you can add payment accordingly. After you enter the information, you need to verify it.
The verification process will have you receive an OTP(One time password) on your mobile phone or email to make sure all the information connects to you.
Related: Leading Fintech Startups in Pakistan
Conclusion
That’s it! Your account is good to go. You are able to receive payments from the UK in PKR. Send them in GBP but receive them in PKR. You can always go back and set your account to send payments or just arrange all your assets and collect them in one place, in one currency.